an army wife's guide to life

food and homemaking goodness

Making use of Everything

One of the things I’m trying very hard to do with this new year is reduce my waste. This especially includes things like leftovers, which before this year, we’ve been terrible about eating. Usually, we’d end up with a fridge full of leftover food and it would just slowly go bad and mold until we finally decided to clean it out. Which was always disgusting and I’d refuse to do it all on my own.

This year, we’ve done much, much better. There has been maybe 2 containers of leftovers from this year that I ended up throwing away, one of them because it just wasn’t very good and shouldn’t have been saved in the first place, but that’s another story. Which brings me to today’s recipe.

It’s a black bean soup made using the leftover cooking liquid from a pot roast. The recipe for that pot roast is here on The Pioneer Woman‘s website. Of course, I didn’t make it the same way she did, and I’ll point out the differences as I go, like always. 

Obviously, you can start this recipe the day before, like I did, and make your crock pot really work, or you can just put together the ingredients and make the soup. As far as money-saving goes, though, the best idea is to make the pot roast, and the soup. Here’s what I did different from the original recipe: I didn’t add the cherry peppers (hubby can’t take food that’s too spicy) or the pimientos (cuz I don’t particularly care for them) and I did add the tomato paste (because I love it). That’s the only difference. And it was DELICIOUS. We both loved it. If you’re just feeding two, that mean’s there’ll be leftovers (there were plenty here), and I left them on low overnight, to keep cooking and getting more tender and delicious.

The next morning, you’ll fish out the beef and some of the liquid and put it away, it’s leftovers for another night. If you finished all the meat the night before, just leave the crock pot on the low setting so it keeps developing flavor. Then you’ll want to add a pound of black beans and half a box ( or 16 oz) of stock to the pot and turn it back to high. I don’t soak my beans overnight because I’m lazy and they come out just fine on the high setting.

Once the beans are cooked, blend the soup with an immersion blender, or in a regular blender. Saute a small onion and some garlic in olive oil and add it to the pureed soup. And that’s it. Serve it with a nice, crusty bread and you have a warm, delicious meal for a snowy day.

I’m going to show you the picture of this soup, but be warned: it’s not pretty…like, at all.

DSCN1154

See, not pretty. But it is DELICIOUS, and you should just take my word for that.

Italian Black Bean Soup Recipe

Leave a comment »

Cheater’s Ravioli

I’ve been finding some awesome ravioli recipes, but I haven’t even started to master making fresh pasta…so I needed a different way to try my ravioli recipes.

And then it came to me: I could stuff it into manicotti. And that is what this recipe is. It’s portobello mushroom manicotti. Instead of using any recipe I found online, I just made it up on the spot.

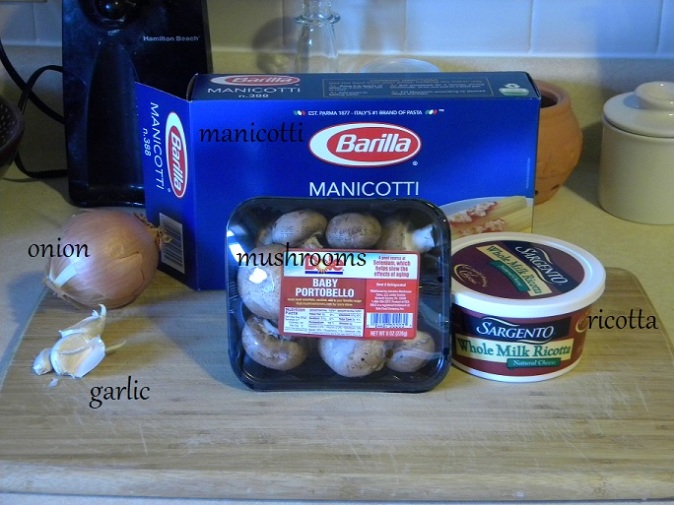
Here’s most of what you’ll need:

Image

I added a few things along the way (there was no real plan, I was completely improvising.), and, you’re obviously going to need some kind of pasta sauce (I used the pot of sauce I have in the fridge), but I’ll let you know what you’ll need.

Preheat your oven to 350°.

So, you’re gonna want to start a pot of water to cook the manicotti (this recipe will make more than enough for the entire box, if that’s what you’ll need. For two people, half the box will do. Go ahead and wash the mushrooms and let them drain in the sink while you chop the onion and garlic (I used 4 cloves) very finely. In a somewhat large pan, go ahead and start cooking the onions and garlic in a little bit of oil over medium heat, until they’re soft and the onions are translucent.

While the onions are cooking, chop the mushrooms finely, adding them to the pan once the onions and garlic are soft. Add salt and pepper while the mushrooms are cooking, letting them go until they’re soft. Add the mushroom mix to a blender, including all the liquids in the pan, add a little heavy cream (or milk will work, too), and blend until at least somewhat smooth. It doesn’t have to be that smooth, there can be some texture to it. Fold the pureed mushroom and ricotta together until completely mixed.

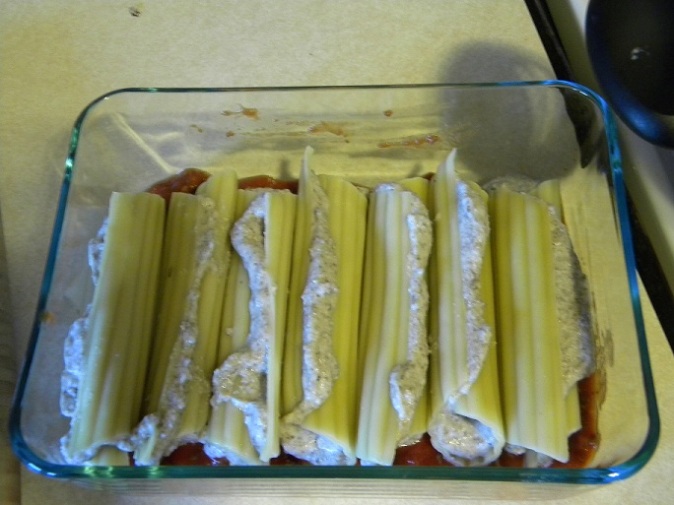
When the water boils, cook the manicotti according to package directions, then drain. You’ll want to let them cool a little before handling them, and you’ll probably be working on other things while that happens anyway. Go ahead and put a layer of sauce on the bottom of your pan. Once they’re cool, unless you have a pastry bag, you can split them down the middle, so they can lay flat, and fill them with the mushroom-ricotta filling before rolling them back up. If you have a pastry bag, or know some other, brilliant way of filling manicotti, leave them whole and fill them. Also, if you know some other brilliant way of filling them, you should let me know.

If you do it my way, they’ll look like this when you’re done filling them:

Image

Cover them with another layer of sauce. If you want to, add a layer of mozzarella over the sauce, but I didn’t because I ran out of cheese (which is a total crime in our household). Bake for 30 minutes, uncovered if you don’t have cheese, but I’d cover it if you add cheese for the first 15 minutes at least.

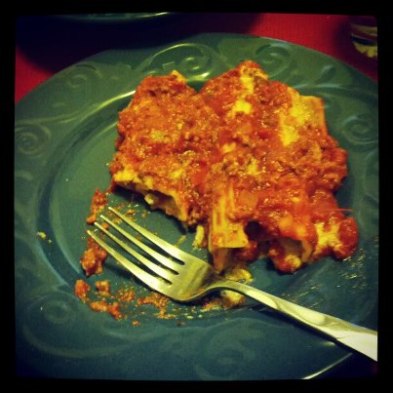
And, enjoy!

Image

I know I sure did.

Leave a comment »

Cheese-topped Pot Pie

Alright, so my original plan for this pot pie was to use a real pie crust as the topping…but that crust got used for something else, and I had to improvise. Sometimes, improvisation leads to the best things, like a cheese crust on a pot pie.

Image


So here’s what you’ll need:

  • 3/4 cup navy beans (dry) or 1 can, undrained
  • 1 cup cream of mushroom soup or 1 can
  • 1/2 of a medium onion, diced
  • 2-3 cloves of garlic, chopped fine
  • butter
  • frozen peas
  • frozen carrots
  • frozen greenbeans
  • 1/2 block Monterrey jack cheese, shredded
  • pie crust (mine was premade and frozen)


  1. If you’re using dry beans, start those early, I didn’t soak mine, I just cooked them in my crock pot on high for about 8 hours or so, and they came out perfectly. Also if you’re cooking your beans, make sure to season them. I added a little salt and pepper to the cooking water, and 2 cubes of chicken bouillon, just to give them some extra flavor.
  2. Preheat the oven to 350.
  3. Cook your onion and garlic in butter until soft. Instead of melting the butter first, I just threw everything into the pan and let it all work its magic together. And I always, always season at this step. Just a pinch of salt and pepper will do the trick. 
  4. Add the beans, with their liquid (especially if you cooked them yourself), peas, carrots, and greenbeans to the pan. You can add whatever other veggies you’d like to the mix as well, but those were the ones I had handy. You want to create a nice balance between the beans and the veggies, so the amounts are up to you as well. Cook those down until they’re tender, before adding the cream of mushroom soup. I used a cup of my homemade soup, but if you’re using a can, 1 should work nicely.
  5. Season to your taste. I added garlic and onion powder, to bring out the garlic and onion already in the pan, as well as more pepper and salt. 
  6. Let it simmer until it thickens up, then add it to the pie crust. Don’t over fill it. I had extra filling when I was done, you don’t have to use it all. 
  7. Top with shredded cheese. You want a nice, thick layer so it makes an actual crust on the top when baked. You’ll also want to protect the edges of the pie crust with foil so they don’t over cook. 
  8. Cook for fifteen minutes, then remove the foil and cook for another fifteen. The cheese should take on a nice, golden brown appearance. 

Of course, this can also be done with chicken, the way you’d think of a traditional pot pie. In that case, I’d also cook the chicken all day in my crock pot so it was falling-apart tender, and go from there.  

Leave a comment »

Menu Planning (Like a boss)

I’m a planner. I like to have a plan in place, I like to know what’s happening next. And I’ve gotten really, really good at planning our menu. Like, really good. I don’t just plan week-to-week anymore, because I’ve found that doesn’t really work as well as I’d like. Instead I plan paycheck-to-paycheck. This lets us not worry about money for groceries once I’ve gone at the 1st and 15th of every month (with a few exceptions), plus it seems to save us money because we’re not blowing it on impulse purchases. Below, you’ll see the first half of February already planned out:Image

That’s just dinner there, but I do plan breakfast and lunch as well, just not all at once. Here’s what I do.

  1. I number the day on a piece of paper. For this planning session, it was 1-17, but the next one will be 18-28. Also on this one, I included the 27th through the 31st of January, so I could see this week in its entirety, even though I already had everything I needed for the January meals. 
  2. I decided how many of what kind of meals I wanted. I.E. I decided that our food plan for each week was going to be two meals that were mostly meat (to satisfy the hubby), two vegetarian meals (so I’ll feel good about myself) and three meals that are mostly veggies, and some meat (this year is about balance, and for February, that’s balance). I marked those meals on the calendar I’d written, not necessarily where they were going to fall for real, though. I marked out each week individually, and put the two meat and two veggie meals right at the beginning so I knew to fill those slots. 
  3. This is where Pinterest comes into play every time. I go through my boards, decide what I need to try and pull up the recipes (this will be important later), and fill out the calendar completely. Don’t get hung up on where you put what, the dates don’t matter yet. If it really bothers you, just figure out how many days you need and number it that way, but don’t get caught up on that while you’re recipe hunting. One thing that will save you big bucks is to find recipes that you can use more than once. If you look at my menu, you’ll notice I have a few things up there twice, plus, my big meaty meals have their leftovers used as the “taco” meals. I always make way more soup than I think I’ll need, so we can have two meals and sometimes even a lunch from it.
  4. Decide on breakfasts and lunches. With these, I’ll end up running back to the store for a few things. But all of my side trips tend to be $20 or less. Usually less than $10, really. I’ll run back to the store after the initial run for eggs, milk, frozen pizza (Dan’s weakness) and bagels. We might run out of little things here and there, but I’m not trying to create a stockpile. 
  5. Figure out what you’ll need. I generally do this by writing out everything that goes into each meal. If you’re like me and know what’s in your kitchen, you can leave out the things you know you don’t need to buy. If you don’t just list everything, which is why I open the Pinterest recipes, so I know what I’m going to need. If you don’t know what you have, check your pantry and cross off what you didn’t need. This will easily turn into a grocery list with everything listed by how much you need. This is also where you want to add your snacks for the week! This is important, because otherwise you’re going to end up making impulse buys while you’re there, or just not buying any and feeling frustrated later on.
  6. Organize the menu to your liking. Mine is never seriously set in stone. I organize it so we’re not having too many similar meals all in the same week, but I also just throw in something completely random sometimes. This is supposed to make your life easier and less stressful, don’t set it in stone at all if you don’t want to. I find, though, that I’m way less overwhelmed if I at least pick the seven things I’m going to make each week and write them on my chalkboard. I can mix and match all I want from there and not feel like there’s too much to choose from.

That’s it. Six steps to making grocery shopping easier. I can generally get through a few weeks on about a hundred dollars or so, planning ahead. Part of it is the planning and part of it is shopping on post, but planning really is the key to saving money.


Leave a comment »

New Year’s Resolutions/January

I don’t normally do New Year’s resolutions, because they’re stupid and no one really follows through with them. But making changes around the New year makes a lot of sense to me, because I like starting at a beginning. And what could be more of a beginning than the new year? So here’s my resolution, and it’s going to sound just like everyone else’s but I don’t really care: I’m going to get healthy this year. And to make it better, I don’t just have a resolution, I have a plan. I’m challenging myself this year, when it comes to food. I’m going to force myself to think about it differently, with my monthly food challenges. 

Which leads me to January. January is my meatless month. Not that we aren’t (or haven’t) eaten any meat this month, but that I haven’t (and won’t) cook any at home. There will be pictures and recipes to come, because the rest of my new year’s resolution is to be better about this blog and update more often (with real pictures). 

What I do need, is suggestions for other food challenges in the coming months. January was easy, because we eat too much meat and not enough veggies here, and I needed to figure out how to make healthy, satisfying meals without meat. Beyond that, I don’t know what to do. So suggest away! 

Leave a comment »

Cheese Steak Calzones

Just a recipe today.

What you’ll need:

  1. 1 medium onion
  2. 1 lb beef (I used ground, but you can use some kind of steak as well)
  3. Butter…yes, butter
  4. 3 cloves garlic
  5. Worcestershire sauce
  6. Brown Mustard
  7. Tomato Paste
  8. Red Pepper (I used the canned roasted type)
  9. Mozzarella Cheese
  10. 1 Recipe of your favorite Pizza Crust or the store bought type
  11. 1 egg (optional)

Start by melting the butter in a small frying pan, and slicing the onion in half then into thing slices. Go ahead and start the onions on medium low heat, stirring occasionally, until they’re starting to turn brown and delicious.

In another, larger frying pan add olive oil and let it heat, while mincing the garlic. Add the garlic and let it cook until it starts to soften. Add the meat and brown it with the garlic. Once it’s browned, add Worcestershire sauce, mustard and tomato paste, to taste. (I used just enough Worcestershire to coat the bottom of the pan, and about a tablespoon each other the mustard and tomato paste.)

Once the onions are nicely caramelized, add them to the beef and let the mixture start to simmer, letting the liquid start to cook down and thicken. This is also when you want to add the red pepper. I used a can of roasted red peppers, and maybe about 2 or 3 large chinks, which you’ll wanna mice finely and add to the mixture.

While the meat mixture is cooking down, preheat the oven and prepare your dough (or make it, if you have a quick dough to make).

Put one layer of Mozzarella on the rolled out dough before using a slotted spoon to put the meat mixture on one side of the dough (you won’t use the whole pound, and if you do, you’re doing it wrong). Put another layer of cheese on top of the meat, just for kicks (and for cheese lovers).

Fold the dough closed and seal the edges closed, folding them over generally works best. If you want a nice, shiny crust, whisk one egg in a bowl and use a pastry brush to give a light coating on the outside of it, but you don’t have to do that. Just bake according to the directions that come with the crust.

Then enjoy. I served it with ketchup and mustard as the condiments, just like you would with the sandwich. It’s as easy as that.  This fed the two of us, but it can easily feed more. I used less than half of the meat mixture on this calzone, you could easily make so many more on this, or just have really yummy leftovers of the filling.

Leave a comment »

A Package of Goodies

This month, I participated in Foodie Pen Pals, where you both send and receive a package of goodies from someone. This is what I got in the mail.

You can see all the goodies I got in the mail here. The sheer amount of variety was awesome, it made me giddy, and so, so excited to get to take pictures of everything.

I made the quinoa with a meatloaf and cheesy cauliflower. This was something new to me, and it was good. My husband was a little iffy on it, but he tends to be weirded out by new things.

I haven’t gotten to the oatmeal yet. It’s about to be breakfast, though, just as soon as I wake up early enough to eat breakfast.


These are going on something, I’m just not sure what. But I’m really excited about it, because it’s something new to me.

The clif bars are going with the hubby to work some day. He is way more into them than I am.

These are going into sprite or some other fizzy drink. Cherry limeade is one of my favorite things, but it’s gotta be fizzy.

These were gone in two days. They were so good! Just the right amount of kick without actually being spicy (at least to me).

If you want more information on foodie pen pals, click the link below:


Leave a comment »

Processing Pumpkins

I love the way that sounds. Processing a pumpkin. It sounds like you’re doing something that’s so difficult, and this is basically easy (except for the fact that I always make something more difficult than it has to be, lol). Now. There are a million places already online that show you how to do this, and my way is really no different, except I’ll tell you where I screwed up, too. And there’s usually at least one way for me to screw up. Even with something as easy as this, there are ways to screw up and not really have the right way to do things. I’ll mention that later, though, cuz this is so much easier than it seems like.

There was the first stab at the pumpkin. I didn’t really know how to do this,but I knew I wanted two halves, so sliced down one side and then took the bottom off (don’t ask, I was just kind of going with the feel of things).

There, the bottom came off. Then I went off the other side. Cutting the stem off probably should have happened just like cutting the bottom off, but I made smaller cuts around it until it popped off. But I do things way more complicated than I have to. Which makes me wonder why anyone is taking advice from me.

You can kind of see the incisions I made to get the stem off. Cleaning them by hand is kind of a pain, but that’s what I had. I’ve seen people use a melon baller, and that seems to help get the stringy part out, but I’d recommend taking the seeds out by hand, cuz you’ll wanna save those for later.

That right there is lovely, pumpkin seedy goodness, fresh from the body of the pumpkin. I’ll come back to those in a minute, though, cuz first, you’ll want to get your pumpkin into the oven.

I didn’t get all the stringy bits out, but that’s not terrible. It’s a little more texture than you might want. Get a melon baller to get those suckers out of there, but nothing I had helped, so they stayed.

Then pop it into the oven at 350° for about an hour. And sit back and wait. Once it’s done, the skin will be blackened in parts, and you’re gonna have to wait to let it cool before peeling it off the meat.

Then chop the meaty parts…

And do not stick it in the blender! It doesn’t work, trust me on this. Use the food processor. Or, if you really have to, use the potato masher. Please, though, don’t use the blender. It didn’t work, it was frustrating, and I started to smell the motor burning. It wasn’t good. I used the potato masher, and this was exactly how it came out:

Exactly like that. (Now someone buy me a food processor, stat!)

Ok, back to the seeds (you can seriously use every part of the pumpkin).

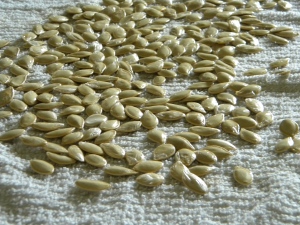
I washed them in cold water to get the guts off of them. I didn’t take a picture of that cuz my hands were wet and you don’t want me to ruin my camera, do you? Once I had them laying out, though, I snapped a picture.

It took a few hours to dry in my kitchen. And then I spread tin foil over a baking sheet, a little bit of olive oil, then the pumpkin seeds, a little more olive oil over the top of that and a sprinkling of salt. I didn’t take pictures of the end of it. And I ate them too quickly to remember to take a picture. But they were delicious.

Leave a comment »

Garlic Bread done Right

Garlic bread is just about my most favorite thing ever. But there is such a thing as bad garlic bread, and I’ve made plenty of it. This time, though, I was determined to do it different;y. It was determined to make really, really good garlic bread. There’s two versions in the picture above. One with cheese and one without. I always need a cheesy version for my hubby, and the more cheese, the better. I happen to like my bread non-cheesy, so I just split it in half, and cheesed half of it for him. Not much is different between them, and anything you want to do to tweak it, go for it and let me know so I can try it.

Here’s what you’ll need:

  1. 1 loaf of bread (I used a French loaf, but any bread is gonna work)
  2. 3-4 cloves of garlic,  minced (or 2 Tbsp minced garlic if you buy it by the jar)
  3. Fresh parsley
  4. 1/2 stick of butter
  5. Mozzarella cheese (optional)

So first things first, you’re gonna want to set your butter out to come to room temperature. While you’re doing that, you can mince the garlic (or use a garlic press, which I totally should have done) and chop the parsley as well. Once the butter is at room temperature, I put everything into my stand mixer and mixed it with the paddle attachment until it was all combined.

While that was doing its magic, I lined a baking sheet with tin foil (to eliminate the mess), preheated the oven to 350°, and sliced the bread in half. I used half a loaf for the two of us and it was gone so fast, so plan accordingly. Spread the butter on the bread and then I sprinkled a little salt on top, just to enhance the flavor, I also added a little extra garlic powder, because I’m a garlic junkie. If you want it cheesy, add as much or as little cheese to the top as you want. Bake it off for 15 minutes or so. My oven seems to cook a little more slowly than I’m used to, so keep an eye on it, you might need less time. It’s done when the butter is melted and the top looks golden and the bread is crispy. If you cheesed it, it should be slightly browned. Then again, that’s just how I like it. Doneness is totally up to you, it’s not like you can undercook bread that’s already cooked.

All that’s left after that is to enjoy. I made Ravioli and homemade pasta sauce, but I was looking forward to the bread more than anything, and boy was it worth it.

↓like it! share it! tell everyone about me!↓

2 Comments »

Ravioli Soup

So this is going to be another pictureless post, because I’m an idiot who likes to forget how to take pictures. Also because my camera is out of batteries at the moment and I’ve been too lazy to put new ones in. Anyway, around here, it’s been rainy and cold and, well, perfect soup weather! This is the time of year I love the most. It’s just starting to get cold, and I’m starting to dream about all the soups I’ll get to eat through the fall and winter. It never really happens the way I plan it, but it’s always nice to dream about. And the first seriously rainy, cold day is usually the day I make my first soup.

That day just happened to be yesterday. And as it happened, I already had a soup in mind to create, so I jumped on it. Here’s what you’ll need:

  1. Spicy Italian Sausage (I used three links, which I pulled out of their casings, but you could use a pound that was never cased in the first place)
  2. A medium sized onion, roughly chopped
  3. About three cloves of garlic, peeled and minced (you can add more or less depending on your tastes, or leave it out if you don’t keep fresh garlic around [but seriously, who does that?])
  4. A (15 oz) can of diced tomatoes (not the fire roasted kind…and the ones I used were canned in sauce, so I didn’t drain them)
  5. A (8 oz) can of tomato sauce (to give an extra kick of tomatoey goodness)
  6. Two boxes of beef stock (I don’t know what size…sorry, but use the boxes, not the cans because they’re bigger. If you go with cans, you might need, like, four or so…maybe)
  7. Onion powder
  8. Garlic Powder
  9. Italian Seasoning
  10. A bag of Mini Raviolis (I used cheese, but you can use any variety…but seriously, the cheese was good)
  11. (Optional) I also added about a tablespoon of tomato paste, because I have a tube that needs to be used and I’ve been adding it to everything…it’s not strictly necessary, though

So once you’ve chopped up your onion and garlic, you’re going to put them in your pot with a little olive oil and get them going until they start to get soft. (If you’re me, you’ll add some salt and pepper at every stage, just to make sure all the flavors are coming out the way they best can, but that’s just me.) Once they’re starting to soften, you can add the Sausage and brown it, breaking it up as it cooks. (Again, I add some salt and pepper here.) Once you’ve got the sausage cooked through, you can add the tomatoes, tomato sauce, tomato paste (if you have it) and the beef stock. I recommend adding them in that order, because if you add the stock  first, things tend to splash (call it experience). To that you’re going to add that onion powder, garlic powder and Italian seasoning. I didn’t measure, but it was probably a little less than a tablespoon of each, and you’ll want to definitely add salt and pepper at this point, to your taste.

Here’s the thing about adding salt and pepper to taste with a soup: I find that with any soup (or long-simmering sauce for that matter) you’ll want to let the whole thing come to a boil and then cool slightly before you get aggressive with the seasoning. This lets everyone get happy in the pot and figure out their balance. then you can add the salt and pepper a little at a time, stirring and (most important) tasting between each addition, until the flavors are balanced. This is the difference between an alright cook and a great one.

Once you have everything balanced, you’re going to want to let it simmer at least half an hour. Just remember that the longer you let it go, the richer and deeper the flavors are going to get. I started mine at 9:30 in the morning, and we ate at 6:30 that night. I just kept the stove on low all day and gave it a rest when it was looking a little low. I also ended up adding some water because of how low the soup was looking, since we had guest coming and I didn’t want to not have enough. Adding water, though, is completely up to you. Just like the salt and pepper, it’s all about taste.

When you’re ready to eat it, you simply cook the ravioli according to package instructions (not in the pot,but separately) until they start to float (that’s how my mom taught me to tell if they’re done.) Then simply strain them, ladle a few into the bottom of your bowl, and ladle the soup on top. Then top with Parmesan cheese, because cheese makes soup delicious.

This pot fed four people, and most of us got seconds, so it would probably feed up to eight people without seconds. Just trust me, though, they’ll probably want seconds, cuz this is an awesome soup.

Leave a comment »